Saturday, April 18, 2020

Quarantine Dust-off

Well, it has literally been YEARS since I posted on my blog.  After getting a very full-time singing gig, I had to put the Bernina away for a while.  I had been wondering if/when I would take it out again.  Then this little think called the Corona Virus came along.  It has totally devastated the live entertainment industry (as well as most other industries), and as a result I have some time on my hands.  OK, actually I have all my time on my hands now!

The quilting world has come to the rescue with homemade surgical masks for healthcare workers, and I joined in a couple of weeks back.  I brought my Bernina down from the guest room closet (oh yeah, we moved out of our 1 bedroom apartment in Manhattan to a house in New Jersey), and made 3 dozen masks for our local hospital.  Here is a picture of my lovely wife modeling a sample. 


I actually ran out of elastic very quickly, so ended up making most of the masks with homemade bias tape ties.  After some friends and family heard about my project, they hit me up for their own PPEs, so I obliged and brought out the fun fabric.


I finally found the patterns for kids, ladies and men that were good tight fits for most, and really have enjoyed getting back in front of the machine again.  In fact, I am considering making a quilt during the quarantine...I mean, if I can't find the time to make one when I am basically locked in my home, when am I going to do it?

Wednesday, February 24, 2016

Oh Deer!

What a fun project this was!  This was my first attempt at applique, and I escaped relatively unscathed!


I have been admiring the works of Luke Haynes, a modern "dude quilter" for a few years now, and recently stumbled across a tutorial on Bernina's website written by none other than Luke himself.  It's a good step by step guide to how he makes his own brilliant works, such as "Hammer":
and The American Context #16:

I assume he uses Photoshop to "posterize" a photo, then prints out the "map" on paper and appliqueing that image to a background.  Anyhow, I was really excited to find his tutorial, and decided this would be a great Christmas gift for my brother and sister-in-law, who needed a quilt from me, but would more likely appreciate an outdoor-sy theme like the deer.

So I'm not going to go through my whole process step-by-step, but will just hit the high points, as this was my first time with a fairly unusual method of quilting.

First off, you print out the stencil pages and tape them together, then cut out the outline of the deer ( you can see that I started that on the right side, using an Xacto knife).


After the deer is cut out, I used it to trace my first fabric (off-white), which I cut out, then cut the dark lined pieces (which transfer to tan in the fabric), then the dotted lines (which transfer to the brown plaid).  Each successive layer is glued to the last, til you have the finished fabric deer (below).


You have to be a bit careful with this, as it's not stiff and has to be supported when you move it around so the layers don't become unglued.  I laid the whole think over a cutting mat and piece of cardboard as I auditioned several different background fabrics


I had planned for this to be my background from the beginning.  I loved the juxtaposition of the quilt with a very "manly" image and message, since my brother's a tough-guy type who would not respond to a traditional quilt.  I decided against it, as I thought it might be too modern and edgy.  Besides, I wasn't crazy about the color combinations together.


I love this fabric, and the colors were good, but felt the deer wasn't standing out as much on the right side.

Another one of my beloved fabrics, but again, I didn't think the deer was "popping" enough, and the design (which looks a bit to me like a forest) was a bit too literal.


Here was another contender.  I love the color, and been waiting for the right quilt for this brown and orange fabric, but for some reason, I felt the background needed to be a bit busier.


As you know, this was the winner.  The green and brown give is a woodsy feel, and the design almost evokes a plaid design, which, to me, screams "Up North".


This was my first time using adhesive spray, which I mostly loved working with.  For a smaller project that I didn't have to roll up or fold to quilt on my home machine, it worked very well.  I have since spray basted a larger project, and I was occasionally getting some shifting and creasing when I rolled up the quilt to fit in the harp space.  Best traits of the spray baste is less time on your knees, no fussing with pins either before or during quilting, and big time savings.  When FMQ'ing I did get some sticky residue on the quilting foot, but a little alcohol took care of that.


Here's the final product.  I made it a little larger (24" x 38"), but that was easy.  Backed with a nice green batik, bound with brown and a hanging sleeve for easy display.  I think they liked it, but with Minnesotans, you can't always tell ;)

Tuesday, February 16, 2016

A few Christmas finishes...

Late to the party with regard to sharing these, but I made a few non-quilt pieces for Thanksgiving and Christmas. 

The first project was a set of three placemats, double-sided, for Halloween/Thanksgiving on one side:


 and Christmas on the other:


My other project is a set of three quilted placemats.  I had planned to make a set for fall (Halloween and Thanksgiving), but as always, I am a little behind in the craft calendar, so when I finally decided to make them, it was somewhere around early November.  Killing two birds with one stone, I ended up making reversible mats, with pumkins in fall colors on one side, and Christmas-themed wrapped present blocks on the other.  Each of us picked out our favorite fabrics for each season and I went to work.
We all picked out fabrics, and our little one ended up liking mom's finished product, so that one became hers, of course!  My only regret is not finishing them until about a week before Thanksgiving, but now we have them for the long haul :)  On the Autumn side, I love the little pumpkins, especially the one with spiders on it.  Since my wife hates bugs of any kind, I like to put this fabric in here and there to tease her a little (I snuck a little piece of it down by here feet on our duvet cover!)  I also love this cool gold-accented binding fabric, which can be seen on both sides, of course.

I made our little one a stocking last year, and though we spent Christmas with my family in Minnesota, we brought it along.


I used three of my favorite Christmas fabrics on this one: the Russian nesting dolls, the packages, and the crimson fabric with gold Christmas greetings.  Was also one of my first projects to use the Bernina's stitch regulator!

Finally, I made a Christmas tree skirt!  I used this tutorial from the Paul's Block Party blog, which was clear and simple, and I highly recommend it if you like the layout.  Even if you don't, it will help you set up the triangular block, and you can put whatever you want in it.


Here the pieced top.  The background is an antique white, which I felt make it a little warmer, and might not show water stains from watering the tree so much as a true white.


I cut the center hole a little bigger than the tutorial suggested just to accommodate my large tree stand.  I also didn't close the circle with ties or anything, as I don't think that's necessary (unless you live in an earthquake-prone area :)).   

Here are close-ups of a couple of the trees.  I especially love this weird, wood-like patterned fabric I used for the tree trunks- a fabric which I have had no use for until now.  Sorry for the images being a little too artsy (read: out of focus)- it was dark and cozy and Christmas-y, and I was too lazy to set up the lighting for the shots.  Truth be told, I finished this project on January 7, which is technically Orthodox Christmas, so I just made it in time!  This is my favorite block, which is a Matrioshka nativity print I got from Joann Fabric.  With a Russian wife, I can always find a use for any Matrioshka-themed fabrics.


There are even a few stray pine needles for to keep things festive!

Saturday, January 23, 2016

Making "E is for Eva"

I am just a little behind on my posting, but have some finishes I need to present to you, so let's start with one of my favorite quilt of 2015.

With so many quilts leaving the house as gifts, I felt it was time to make my daughter her first quilt.  I have a stockpile of fabrics I have been collecting since she was born, waiting for the day when I would build her something special.  As any self-respecting 5 yr old girl, Eva is a big fan of pink and purple, so this quilt would have to be pastel-dominant!  I wanted it to be very personal, so I decided to make a big letter "E", as she was learning her letters at the time.

After a few sketches, I settled on a giant letter "E" using rectangular blocks with two rounded corners, similar to this design from Quilt Dad's Paper Lanterns quilt pattern.  Here's a shot of Quilt Dad's cool Paper Lanterns quilt:


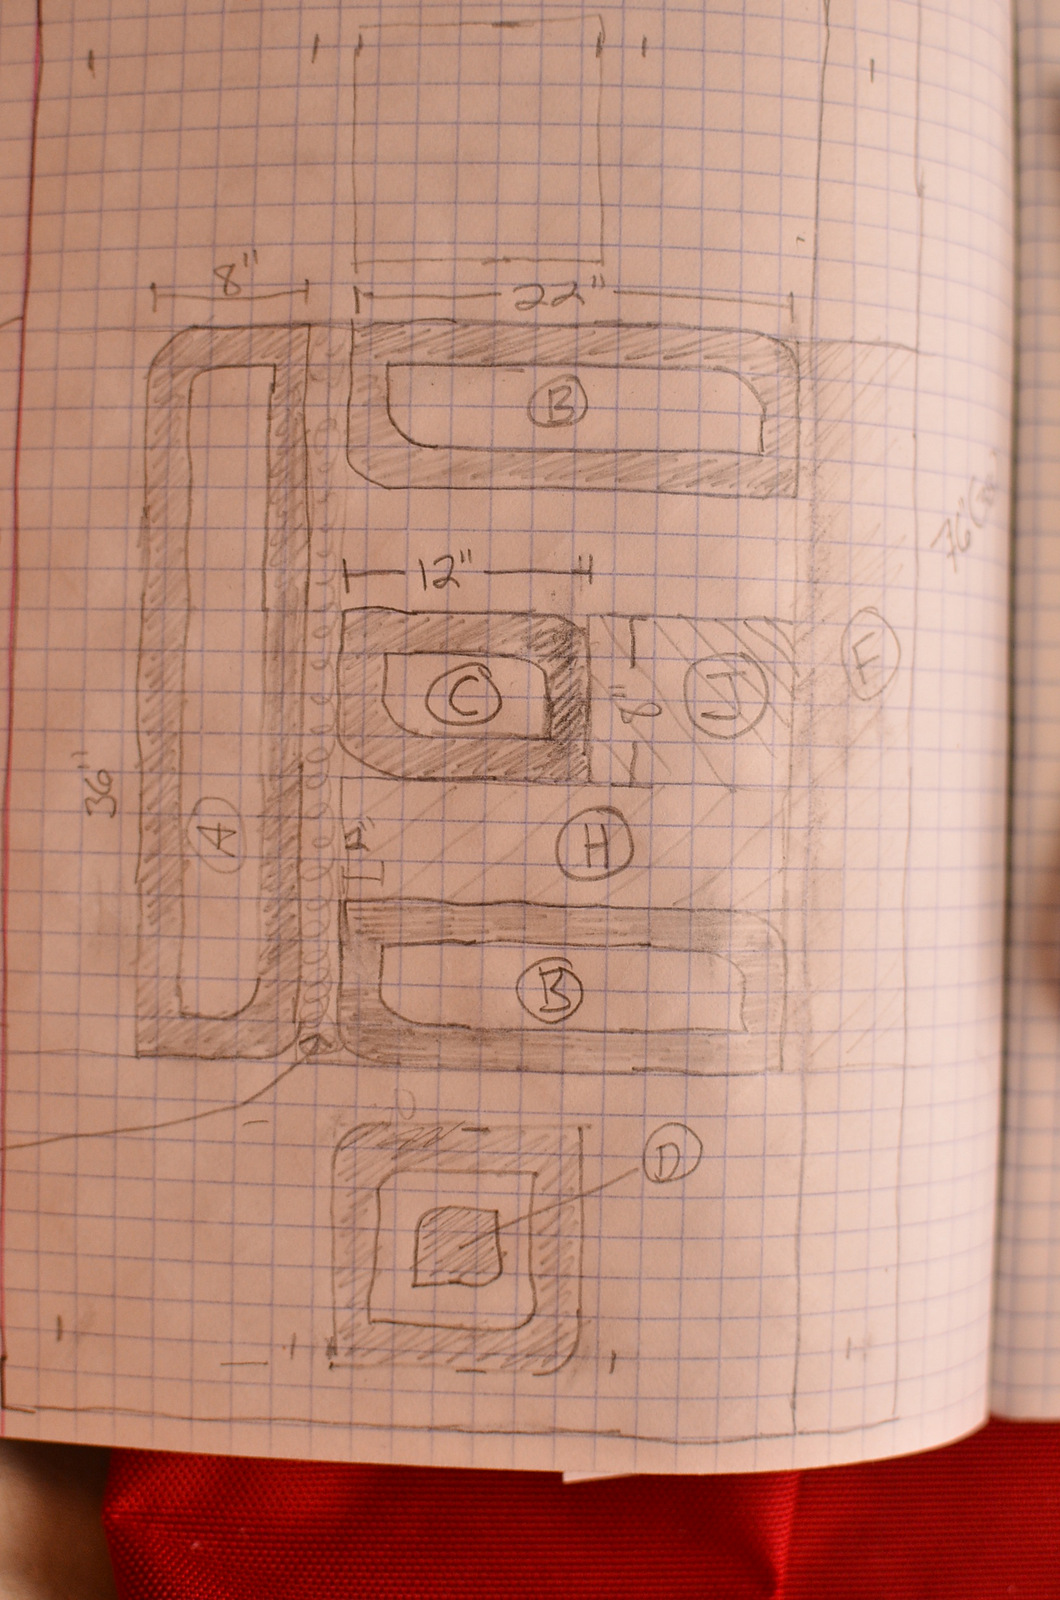
As is my regular M.O. these days, I first made a sketch of the quilt, then (particularly in the case of a more complicated, non-repeated block design) draw up dimensions of each piece, what fabrics will be used in each section, and how much of each fabric will be needed. 


This quilt was specifically designed for an IKEA Kura children's bed. 


Since the space between the bed sides and the mattress is really tight, I wanted a quilt that wouldn't need to be "tucked in" on the sides, but would instead sit on top of the bed without any extra fabric around the sides of the bed.  This made for unconventional dimensions: 42" x 64". 

My next step is to do a mock-up of the new block I will be building, just to make sure I don't make more expensive mistakes on the "hero" fabric.  Below you can see the rounded square design, which I made using a drunkard's path template


I also got to practice some free motion quilting using my new machine, which has been an amazing revelation!  I hesitate to stray from the quilt story, but will just say that my new Bernina 440 QE has completely changed my free-motion sewing experience!  If you have not tried a Bernina with BSR (stitch regulator), it will change your life!  AMAZING!  I was unspeakably fortunate to get this machine used, with less than 900 stitches sewn (it has a counter).  In the about 8 months since it came to me, it now has 300,000 stitches sewn, so it was basically new, and I got it for a fraction of what it sells for used.  Here's a stock photo:


Also, I received a Bernina walking foot for Christmas, so I am all pimped out for a new year of quilting!

OK, back to the task at hand!  I'll just post a few in-process pics of my project.  The first features one of Eva's favorite fabrics- pink fairies!  I gave it a purple boarder to give her what she likes.


Here's a shot of the completed E pieces, auditioning background fabrics.  I ended up choosing this one, as it kept with the pink theme, but was subtle enough not to overpower any of the letters.


Pin basting.  Not for this one, but for my last two quilts, I have begun to use spray basting along with pins.  Probably overkill, but the result is pucker-free, so the extra work is worth it.  I'm not sure I will continue to spray baste for bed quilts (the spray basted quilts are decorative wall hangings), since I don't wash the quilts before I use them.  We shall see.


Here's the finished product.  It sits on Eva's bed, but easier to see hanging on the wall.  She didn't want it on her bed when I presented it to her in January, so I hung it on the wall.  Now it's on her bed, she loves it and sleeps with it every night.  It's backed with a mix of flannel scraps, as I don't have a lot of flannel lying around, and there have been grumblings around the house that the regular cotton backing isn't cozy enough.


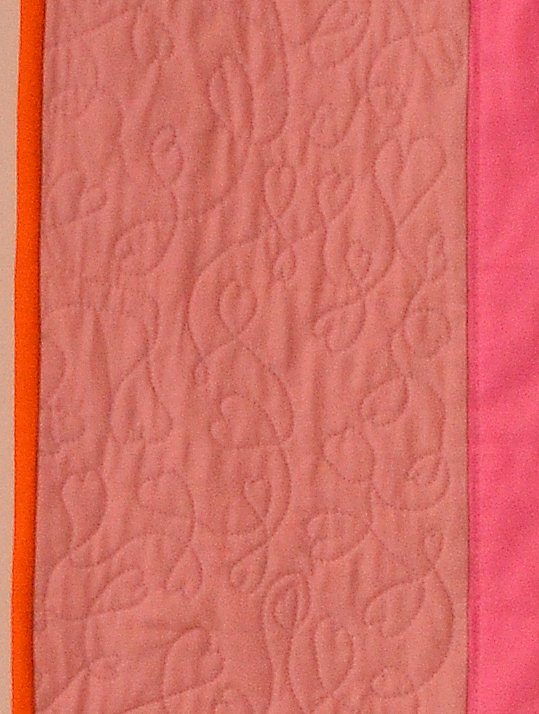
As you can see, I have a row of 3 blocks above and below the E.  It may be hard to see in the photo, but I quilted with heart loops in the background and echo quilted around the boarders of the blocks.  I had to zoom in for the detail on the quilting, so this pic is a little grainy, but you get the idea.  My first time using the Bernina to FMQ, so a little sloppy, but every heart is made with love :)  My wife and I laughed at how a few of the hearts I made look a little like butts, so I was careful to be more deliberate in sewing each heart!


I had so many fun fabrics I wanted to feature in this quilt, so I went a bit color crazy!  Here are just two: bunnies and balloons & pink parasols and unicycles!  Great for a little girl!


Here it is, living on Eva's bed.  The bed sides are covered in purple butterfly contact paper I got at the dollar store.  Along with the pink canopy from Amazon, it was an easy way to turn the bed into a very girly, very personal piece.


Thanks for looking, and I hope to catch up on my other finishes and UFO's in the next week or so!

Thursday, July 16, 2015

Kaleidoscope Memories

Although I finished the Kaleidoscope quilt back in September, I gifted it January, when I was able to hand it to our friends in Minneapolis.  Yes, that was 6 months ago...  Well, I am posting some more pictures of it because I found these on my camera and just felt like putting them up :)


Our friends loved it, and agreed to pose it on the wall where it will eventually live. They both have great eyes for art and design, so I hope it meets their high standards!  I installed a hanging sleeve, so hopefully it is up and being appreciated right now :)

Tuesday, July 7, 2015

Summer in the West

We are spending another summer out West.  This time we are in Oregon, making memories with my sister and her family!  Eight kids, seven adults, three pools, two trampolines and one BIG house makes for a hectic and fun summer!


It has been HOT so far.  A week of mid- to upper 90's and a couple days we hit 100 degrees, so there's no shortage of sun around here.  Above is a picture my nephew on the Oregon coast, where it was almost 30 degrees cooler last week.

As is my M.O., shortly after arriving in town, I hit a couple of the local thrift stores in search of quilty things, and wouldn't you know it?  I found a sewing machine to use for the summer :)  The king size quilt top I made for my sister has been sitting in a box for a year and a half, waiting to get bound after it was quilted by a local with a long arm machine.  My little project during my visit is to bind it for her, so I needed a machine, right?  Well, I probably should have just borrowed one from someone in town, but then how can you resist a bargain like this... Anyhow, back to the thrift store...  After 5 minutes of wandering around the store I see someone pushing a shopping cart full of sewing machines toward the housewares section.  Now that was like a Largemouth Bass seeing a frog swim by!!!  I stalked him until he began unloading his treasures.  One of the first things he put on the shelf was this Bernina 1000 Designer machine.


Similar to the still-in-production Bernina 1008, this mechanical machine is prized by the Amish and Mennonite communities because the motors can be removed and the machines worked with a treadle- the main difference between mine and the 1008 is that mine was made in Switzerland rather than Thailand.

I snatched it up lickety-split, and after a quick plug-in test, I brought it home.  It doesn't have an extension table or any feet, and the bulb was burnt out, but it ran in the store so I figured it was worth dropping $30 in hopes that it worked OK.

After a stop at the local Bernina dealer I got a piecing foot ($5) and some jealous Oohhhs and Aahhhs from the technician, who said it was worth $1000!!! That was welcome news, as I already have a 440 QE at home, and don't really want to lug this on the plane ride home!

After the initial test run at home, it emitted this electrical burning smell and the bulb didn't work, so I brought it in to the technician, who said it wasn't just a burnt out bulb, but an electrical problem, which could be dangerous if not fixed.  So...$121 later it's tuned, purring like a kitten and...still smelling like a small electrical fire!  I will take it back in when I finish my goal project of binding my sister's quilt.


Here's the quilt on the long arm, with just a few stitches finished.  Duck Duck Berry Duck is the name of this quilt, and here's a blog post about it.  It looks great with a generic flame-like quilt pattern (sister didn't want any flowers) in green.  On second thought, I should have gone with a yellow thread, but live and learn- I think the green detracts a little from the quilt top design, but that's only a minor gripe.  It looks fantastic, and even better to have such a large top quilted by someone else!!!  It gives me a headache imagining doing that on my home machine...NO THANKS!

I also completed a few gift projects for my daughter and her cousins: the girls got FROZEN tube-top dresses and the boys got custom pillowcases (two got Pokeman fabric and one got antique cars and baseballs).  Picture to come!

Saturday, December 27, 2014

Christmas finishes

We had a wonderful Christmas, and I did some last-minute quilty gifts for friends and family alike this year.

First off, I made a very cute train-themed pillowcase for our choo-choo-loving 4 yr old friend Isaac.  I stupidly didn't get a picture of it before I delivered it (it was a Chanukah gift, so it went out earlier this week), but I will eventually snap a pic of it to share.  In the mean time, here's what the main fabric looks like. 


Got it from City Quilter in Manhattan.  They have a line of New York City themed fabrics, and this is a newer one that I think they commissioned in the last year.  The cuff of the pillowcase is this fabric:


Very cool NYC subway stop names, which Isaac appreciated, as he knows the system inside and out!  His parents said that he didn't sleep on it the first night because it wasn't washed, but he slept with it, holding it like a stuffed animal.  So cute!  I also love giving gifts that are so appreciated- it makes the work so worth it :)

Second, I made a pair of mug rugs for our dear friends in eastern Pennsylvania.  I broke into my collection of Matryoshka doll fabric for my first mug rug project, and whipped them up surprisingly quickly. 


They measure about 9" by 16" and have this cute Russian doll nativity characters fabric that I got at Joann's a few years back.  The back has another Matryoshka fabric I got in Fairbanks, AK last winter.  The border fabric is from that same collection.


The two rugs have different free motion quilting designs.  The first one I did with  a looping design, but the second one I decided to do some echo quilting around the characters...wish I had done them both that way, but they both have their own personalities, so that's OK, I guess.


Here's one of our mugs rugs in action.  We tested it out on Santa on Christmas Eve.  We think he was very impressed!
 
 
My third project was a Christmas stocking for my daughter using the same focus fabric from the mug rugs.
 

I did the same echo quilting around the figures, stars on the toe and tracing around the stars and loops in the heel.

 
I actually like the back more than the front :).  Again, I echo quilted with yellow thread around the figures.  Finishing this one was strangely exhilarating- it was surprisingly moving to me to have made this for my daughter, imaging her growing up and being delighted with gifts from Santa each year as she gets bigger.  I was also super proud of how good it looked- I can do other things besides quilts :)